Get started
You are new to Callico and would like to annotate a set of documents on a dedicated interface? On this page you will find a detailed, step-by-step tutorial to meet your needs.
Note
Links from this page will always open in a new tab so you can easily come back to this tutorial by closing each newly opened section.
Prerequisites
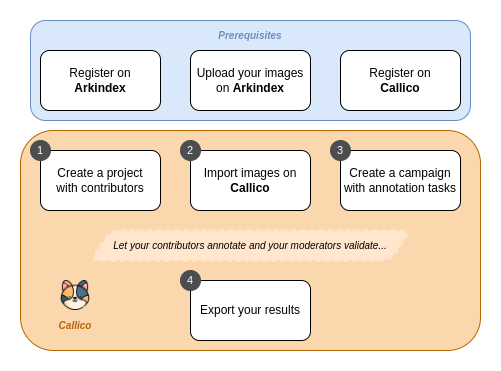
Bring your data online with Arkindex
As Callico currently only supports the import of documents from Arkindex, we invite you to create an account on demo.arkindex.org, Teklia's document processing platform. Registration on the public Arkindex demo instance is completely free, so you can start experimenting with Callico right away.
With your newly created Arkindex account, you will be able to upload your documents, whether they come from local files or from a IIIF server.
Register on Callico
The last prerequisite prior to using Callico is to create an account on the instance of your choice. To register on Callico's main public instance maintained by Teklia, you can simply follow this link.
Note
Authenticated users can create projects on instances where the PROJECT_CREATION_ALLOWED setting is set, this is the case on the Demonstration instance managed by Teklia.
Otherwise, you need to be a staff member to create projects on Callico. To do so, you will need:
- to contact us to be promoted to this rank, when working on instances which are managed by Teklia as Callico,
- or set the boolean
User.is_stafftoTrueon the relevant user account in your database if you are managing and working with your own instance.
Before you begin your Callico journey, we also recommend that you read the short sections that introduce Callico's key concepts and features: Projects, Elements, Processes, Campaigns and Tasks.
Reach your goal - Collect annotations on your documents

Setup your project and import elements
Once your data is ready on Arkindex and you have created your Callico account (see the prerequisites section), you can start your project.
As soon as your project is created, it is time to invite your collaborators to join you. You can invite contributors to annotate your documents, moderators to moderate their annotations, or other managers to help you manage your project.
The next step is to import the documents for which you wish to collect annotations to Callico. This set of documents can be easily imported from Arkindex. You may also wish to browse the imported documents to check that the import went smoothly.
Create and configure your campaign
Now that your project has been properly set up and your documents are available on Callico, you should take a moment to select the campaign mode that best suits your needs. Then, you can proceed with the creation of an annotation campaign.
With your campaign created, you can move on to its configuration:
Manage the annotation tasks
Now that you have everything set up, all you need to do is define which parts of your documents you want to be annotated. To do this, you need to create annotation tasks that you can leave unassigned and available for volunteers or assign directly to specific contributors. Assigned tasks must then be published so they can be annotated.
You can validate the configuration of your campaign and your tasks by generating preview tasks. If something does not work out, you can always unassign draft and pending tasks, and delete unassigned ones.
Next, you will need to make room for your collaborators, by giving your contributors time to annotate the tasks available and/or assigned to them. Then, it will be your moderators' turn to validate or invalidate these annotations if a moderation phase is necessary to clean up your final data.
Bonus: Export the collected annotations
Once you have started collecting annotations, you can track the progress and the trend of your campaign by regularly exporting the results in CSV format or in XLSX format.
Eventually, when your campaign is complete, you will also be able to export all the annotations on your documents back to Arkindex.
Thank you for trying out Callico!
If you have any problems with the instructions above, please contact us at callico@teklia.com. We will be pleased to answer any questions you may have, and welcome suggestions to improve this documentation.